


You don’t need to renovate your home or spend a fortune to make it genuinely smart. Here’s how to do it at three realistic price points — and what you actually get at each one.
The smart home industry has a marketing problem. Walk into any electronics retailer or scroll through any tech publication and you’ll encounter ecosystems, starter bundles, and flagship devices priced as though transforming your home is naturally a four-figure project. Apple’s HomeKit ecosystem looks stunning but adds up fast. A full Lutron Caseta setup with professional installation can run into the thousands. Even the “affordable” Google Nest ecosystem starts making assumptions about your budget that not everyone shares.
Here’s what that marketing tends to obscure: a meaningfully smart home — one that actually changes how you live, saves you time, and reduces energy waste — is achievable for a lot less than the industry would like you to believe. The difference between a $150 smart home setup and a $1,500 one isn’t always quality of life. Often it’s just feature depth and the number of rooms covered.
This article is organized around three realistic budget tiers: $150, $300, and $600. Each tier is treated as a complete starting point, not a teaser for the next level up. If $150 is your ceiling, you’ll leave with a genuinely useful system. If you have $600 to invest, you’ll understand exactly what that buys you and why. And importantly — each tier builds on the previous one, so upgrading later is never a matter of starting over.
One ground rule before diving in: these kits assume a Wi-Fi-based ecosystem for the lower tiers (because it requires no hub and no extra hardware investment), transitioning toward a hub-based approach at the higher tier where the additional control, reliability, and local processing genuinely justify the cost.
The $150 Smart Home Kit: Starting Where It Actually Matters
A hundred and fifty dollars sounds modest, and it is. But it’s also more than enough to build a functional smart home around the three things that affect daily life most directly: lighting, power management, and voice control.
What Goes Into It
The backbone of a $150 kit is a voice assistant hub. Amazon’s Echo Dot (4th or 5th generation) sits around $35-40 and gives you a capable speaker, a microphone array, and access to the entire Alexa ecosystem. If you prefer Google’s assistant, a Google Nest Mini or Nest Audio does the same job at a similar price. Apple’s HomePod Mini is slightly more expensive but is worth considering if you’re already in the Apple ecosystem. Pick one and commit — mixing voice assistant platforms at this budget level creates more headaches than it’s worth.
With roughly $110 remaining, the most impactful purchases are smart bulbs and at least one smart plug. Two Philips Hue White bulbs (available in two-packs for around $25-30) in the rooms you use most give you schedulable, dimmable lighting that responds to voice commands and automations. Alternatively, IKEA’s TRÅDFRI bulbs are excellent value and have improved significantly in recent years — a three-pack costs under $20, and the quality gap between them and premium options is narrower than it used to be.
Add two TP-Link Kasa smart plugs (around $10-12 each) and you’ve extended control to any lamp, fan, or small appliance in the house. A smart plug under a floor lamp in the living room, for instance, is functionally almost identical to a smart bulb in the overhead fixture — and considerably cheaper when you already own a lamp you like.
At this budget level, automation happens primarily through the voice assistant’s native app. Alexa Routines, for example, let you set “good morning” and “good night” commands that trigger sequences of actions: lights on at a specific brightness, a particular plug turning on, a news briefing playing. It’s not the most sophisticated automation possible, but it works reliably and costs nothing beyond the hardware you’ve already bought.
The Real-World Impact
Consider a student living in a one-bedroom apartment who built this exact setup. The Echo Dot went in the kitchen. Two smart bulbs went into the bedroom and living room lamps. A smart plug controlled the power strip running the desk lamp and monitor lights. Total spend: $148. The result: every morning starts with a voice command that turns on the bedroom light gradually, reads out the weather, and activates the desk setup. Every night, one phrase turns everything off. Two months in, the novelty had faded but the convenience hadn’t — the setup was just part of how the apartment worked.
That’s the honest benchmark for this tier. Not impressive to show friends, but genuinely useful every single day.
The $300 Smart Home Kit: Adding Intelligence and Coverage
Doubling the budget doesn’t just mean buying more of the same things. At $300, you can start introducing devices that actively make decisions rather than just responding to commands. The system begins to feel less like a remote control and more like something that anticipates what you need.
Expanding the Foundation
Start by taking the $150 kit and expanding it: add two more smart bulbs for additional rooms, and replace at least one of the basic smart plugs with one that includes energy monitoring — the TP-Link Kasa EP25 or the Eve Energy (if you’re in a HomeKit setup) give you real-time and historical power consumption data. This single addition tends to produce behavioral changes in how people manage their home energy use. Seeing that a space heater left on in an empty room is costing sixty cents an hour is a different kind of motivation than knowing abstractly that heaters use electricity.
The First Sensor: Why This Changes Everything
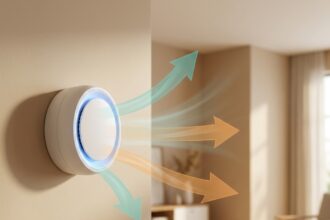
The most transformative single purchase at this tier is a smart motion sensor. Around $20-30 gets you a reliable option — the Aqara Motion Sensor, the IKEA TRÅDFRI motion sensor, or Philips Hue’s own motion sensor if you’re in their ecosystem. Place it in a hallway, a bathroom, or a kitchen, and suddenly your smart home is no longer waiting for commands — it’s reacting to what’s actually happening.
A hallway light that turns on when you walk through at night and turns off after ninety seconds of no motion is, objectively, a small thing. But it’s also something that works perfectly every single time without you thinking about it. That’s the quality of life shift that distinguishes a reactive smart home (one that does what you tell it) from a proactive one (one that does what makes sense).
At this budget level you should also consider a smart thermostat, if you don’t already have one. The Google Nest Thermostat (not the Nest Learning Thermostat — that’s more expensive) retails around $130 and adds genuine energy savings through scheduling and remote control. Studies consistently show smart thermostats reduce heating and cooling costs by 10-15% annually for average households. In a home with significant heating or cooling bills, this device often pays for itself within a year or two.
A Note on Platform Coherence
At $300, you’re building something substantial enough that platform fragmentation starts to matter. If your bulbs are in the Alexa ecosystem, your motion sensor is controlled through IKEA’s app, and your thermostat lives in Google Home, you’re managing three separate environments. This isn’t fatal, but it’s friction. At this budget, spend a few hours reading about which platforms your preferred devices support — most quality devices support multiple ecosystems (Amazon, Google, Apple), but it’s worth confirming before you buy. Building around a single app like Amazon Alexa or Apple Home makes the experience considerably more fluid.
The $600 Smart Home Kit: Local Control, Broader Coverage, and Real Automation
Six hundred dollars is where a smart home genuinely starts to feel cohesive. It’s also where the calculus around infrastructure shifts — specifically, where adding a hub and moving toward local processing (rather than everything going through cloud servers) starts making more sense.
The Case for a Hub at This Level
A hub — specifically a device running Home Assistant, or a dedicated Zigbee coordinator like the Philips Hue Bridge or Samsung SmartThings Hub — changes the fundamental architecture of your smart home. Instead of each device having its own cloud connection and its own app, everything routes through a central controller that lives in your home.
The practical benefits are significant. Automations execute in milliseconds rather than waiting for a round trip through company servers. Your smart home works even if your internet goes down. And perhaps most importantly, you gain access to cross-platform automations that aren’t possible when devices live in separate ecosystems — a Zigbee motion sensor from IKEA can trigger a TP-Link Kasa plug and an Aqara door sensor can set off a Sonos notification, regardless of who made what.
A Raspberry Pi 4 running Home Assistant (or a purpose-built Home Assistant Green device at around $99) plus a Zigbee USB stick (the SONOFF Zigbee 3.0 USB Dongle is well regarded and costs around $20) gives you a formidable local hub for under $130. It’s the single most powerful purchase at this budget tier, though it requires a couple of hours of setup.
Building Out the $600 Kit
With the hub and coordinator handled, the remaining $470 goes toward meaningful coverage:
Four to six additional smart bulbs expand coverage to every main room in a typical two-bedroom apartment or small house. At Zigbee prices (IKEA, Sonoff, or third-party Philips Hue compatible bulbs), this costs $60-80. Two or three additional smart plugs with energy monitoring bring another $40-60. A second motion sensor for a different zone adds $25.
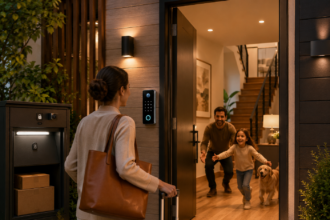
At this tier, a door/window contact sensor becomes worth adding — particularly for a front door. Automations that trigger based on whether a door has been opened (turn on the hallway light when someone arrives, run a welcome routine, or send a notification if a door has been left open for more than ten minutes) add a layer of context-awareness that the lower tiers can’t achieve as cleanly.
A smart smoke or CO detector — Nest Protect at around $119, or the more affordable First Alert Z-Wave model — rounds out the safety side of a $600 kit and integrates with automations in a way that standalone detectors can’t. If smoke is detected and you’ve left a smart plug running a heater, the system can cut power to it automatically.
What Automation Looks Like at $600
The jump in automation sophistication at this tier is substantial. A few examples of what becomes possible:
When the front door contact sensor triggers in the morning, Home Assistant checks the time. Between 6am and 9am, it activates the kitchen light at 50% brightness, starts the coffee maker via a smart plug, and begins a gentle wake-up light sequence in the bedroom. After 9am, the same door opening just turns on the hallway light.
When the last person leaves the house (detectable through phone presence tracking, which Home Assistant supports via the companion app), the system turns off all lights, sets the thermostat to an energy-saving mode, and sends a confirmation notification. When the first person returns, everything comes back to its normal state before they’ve taken their coat off.
These aren’t hypothetical scenarios — they’re the kinds of automations that Home Assistant users with comparable setups run daily. They’re also the kinds of things that simply can’t be built on a fragmented, app-per-device approach without considerable compromise.
Practical Advice Across All Three Tiers
A few principles hold true regardless of your budget:
Buy one thing at a time and live with it. The temptation when starting a smart home is to buy everything at once. Resist it. Getting one smart bulb or one smart plug and living with it for a week teaches you far more about what you actually want than any amount of research.
Start with high-frequency interactions. The devices that generate the most value are in rooms and scenarios you encounter multiple times a day. The bedroom light you interact with every morning and every night will deliver more daily value than a smart light in the guest bedroom you use four times a year.
Don’t forget about the app experience. Hardware specs matter, but the app you interact with every day matters more at the lower tiers. Before buying into any ecosystem at the $150 or $300 level, download the companion app and spend fifteen minutes with it. If it feels clunky or confusing, that friction will wear on you.
Factor in longevity. Cheap smart home devices from manufacturers with no track record are frequently abandoned — firmware stops receiving updates, cloud servers shut down, and the devices become either non-functional or isolated from their ecosystems. Established brands (TP-Link Kasa, Philips Hue, IKEA TRÅDFRI, Aqara, Sonoff) have longer histories of support. At any budget level, this is worth weighting.
Conclusion: The Smart Home You Can Actually Afford to Build
The smart home industry wants you to believe that meaningful home automation starts somewhere around a thousand dollars. The reality is considerably more accessible. A $150 kit built around a voice assistant, a few smart bulbs, and a couple of smart plugs delivers genuine daily convenience. A $300 kit adds sensors, energy monitoring, and a thermostat that starts to make real decisions. At $600, a local hub and expanded coverage create a genuinely cohesive, reliable, and powerful system that rivals what people spend five times as much to achieve.
The key is spending intentionally — knowing what each dollar buys, building within a coherent platform, and adding capability gradually rather than accumulating devices that don’t talk to each other. Done right, a smart home at any of these three tiers isn’t a compromise. It’s just a smarter approach to a space you live in every day.